Originally published Metal Roofing Magazine, May 2001
Background
At the time this article was originally published, the United States was in the middle of a building code transition. Specifically, the three (3) primary building codes: 1) Uniform Building Code (UBC), 2) Standard Building Code (SBC), and 3) National Building Code (BOCA) were being combined into the International Building Code (IBC). The IBC was first published in 2000, released on a three (3) year cycle since. The most recent version of the IBC is the 2021 edition.
While the earlier codes included long-standing wisdom regarding the sealing of metal roof panels when slopes are 3:12 or less, pre-engineered metal buildings, representing a significant volume of the metal roof projects, were exempt from these requirements. This void in the building code left large metal buildings, that did not include side lap sealant, vulnerable to roof leaks when exposed to mixed precipitation events that include rain, freezing rain, snow and/or ice. The absence of sealant along the side laps of any low slope metal roof can allow water to penetrate the roof assembly via capillary action, drawing water into the building.
The point of this article is that, regardless of what the building codes require, it is always a good idea to incorporate “best practices” to improve overall durability and safety of the completed building. While the code portions of this article are clearly outdated, the need to construct buildings that meet (but preferably exceed) the building code, is more important than ever. This opinion is based on the overall poor performance of code-minimum construction and the lack of redundancy incorporated into building envelope design.
— Derek Hodgin
Original Article
Metal roofs continue to gain popularity in both residential and commercial applications. Metal roofs can provide years of performance with minimal maintenance required. However, as with all roof assemblies, the overall performance is directly related to the attention to details during installation.
One detail that should be carefully considered in the installation of metal roofs is the use of sealant at panel joints. The use of sealant at end laps is a common practice unless the roof has a steep slope. However, sealant along side laps is often omitted. The absence of side lap sealant makes some roofs vulnerable to water intrusion, which can have expensive consequences. This article discusses the importance of side lap sealant on low slope roofs; the requirements of building codes, industry standards, and manufacturers; and how to determine when it is needed.
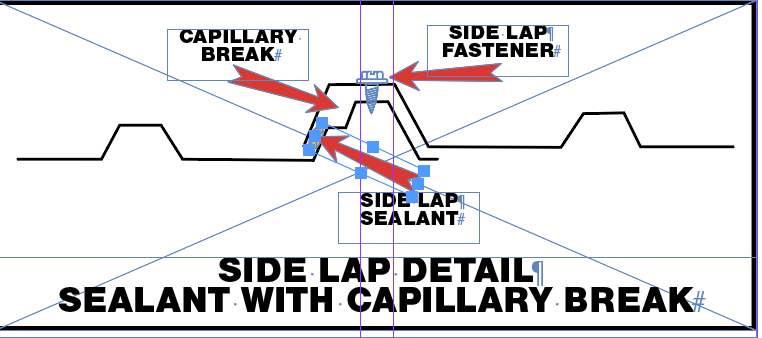
Side lap detail, showing proper placement of sealant and a capillary break (not to scale)
The Importance of Side Lap Sealant
While there are numerous metal roof products currently available, the focus of this article is ribbed metal roof panels with overlapping sides. These roof panels are most common on pre-engineered metal buildings. This type of building is typically selected for commercial uses, but can also serve as a garage or workshop on residential applications. These roof panels are typically 3-feet wide and have corrugations that provide rigidity and bending strength. The length of metal roof panels vary; lengths of 24 to 40 feet are most common. In pre-engineered metal buildings, the roof panels are structural elements that are supported by metal purlins spaced approximately 5-feet on center. A layer of vinyl-faced batt insulation is often sandwiched between the purlins and the metal roof panels.
Hydrostatic Versus Hydrokinetic Roof Design
Roof configurations can be divided into one of two (2) basic classifications: hydrostatic (water barrier) or hydrokinetic (water shedding). A hydrostatic configuration anticipates that water will accumulate on top of the roof surface and must be detailed accordingly. The details must be made watertight such that water can stand on the roof for an extended period of time (up to 48 hours) without penetrating the roof assembly. The most common hydrostatic roofs are low slope (1/4:12 to ½:12) configurations covered with built-up (BUR) or single-ply membranes such as EPDM, PVC or TPO.
As the slope of a roof increases, so does its ability to shed water. Hydrokinetic roof designs depend on the slope to effectively remove the water from the surface of the roof. In the absence of standing water, the watertightness of the installation details become less important. Water simply flows over the roof surface via gravity and is not provided an opportunity to flow uphill into the seams and/or penetrations of the roof assembly.
In the case of pre-engineered metal buildings, roof slopes are often ½:12 to 2:12. It is my opinion that these roofs should primarily be designed and detailed as hydrostatic. Exceptions to this rule would include buildings that are located in dry and/or warm climates or buildings that function as shelter only, where limited water intrusion is of no consequence. Any building with a roof slope less than 3:12 that is subjected to moderate winds, moderate to heavy rainfall events, freezing temperatures, or snow and ice events is a good candidate for hydrostatic design details.
Capillarity
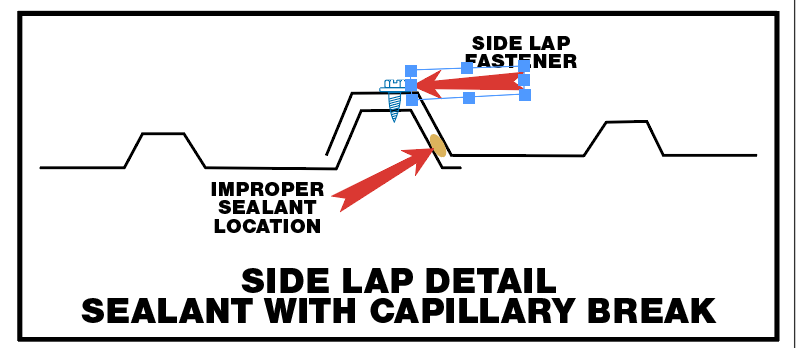
(not to scale).
Typical installation details require that side laps of the roof panels are screwed together with sheet metal “stitching” screws. If snow, ice, or water accumulates, the only defense the lap seams have against water intrusion is the height of the seam above the roof surface. The height of the lap seam is usually 1 to 2 inches, with 1-1/2 inches being the most common.
The height of the lap seam can be an easy obstacle for water to overcome, particularly on a roof slope of 3:12 or less. To make the situation worse, contractors will often torque the stitching screws to provide a tight fit between the adjacent roof panels. This condition not only crushes the gasket or sealant, but can pull water into the lap seam due to increased capillary forces.
For this reason, some manufacturers have incorporated a dimple in the lap profile to create a capillary break. When water reaches this void, the capillary draw is eliminated. (This is also a good practice to use in flashing details.) Therefore, a capillary break should be incorporated into the side lap of the roof panels whenever possible. In the absence of a capillary break (and properly installed side lap sealant), water can easily migrate into a roof assembly and cause damage.
Building Codes
Most building codes recognize the potential for water intrusion on metal roofs. In general, building codes require side laps to be sealed (using sealant or solder) for metal roofs with slopes of 3:12 or less. It should be noted that building codes represent minimum standards. The requirements set forth by a building code generally represent accepted and tested practices that should not be violated without good reason.
Unfortunately, the building codes specifically exclude pre-engineered metal buildings from the requirement described above. I do not know why this exclusion exists. Apparently, there is an expectation that the manufacturer, owner, and contractor will be able to determine the roof design that is adequate for their building. Unfortunately, this situation does not always work out, particularly when budgets are involved.
While the cost of side lap sealant applied during new construction is minimal (approximately 10 to 15 cents per sq. ft.), it is often the first item to get cut when budgets are tight. Due to the substantial benefit and low cost, this action should be strongly discouraged.
Industry Standards
Industry standards for metal roofing have been slow to develop. In the past five years, however, relevant standards have been published by the National Roofing Contractors Association (NRCA) and the Metal Building Manufacturers Association (MBMA). Both publications are considered authoritative sources of accepted practices and details for metal roof design and installation.
The NRCA added a section on metal roofing to the fourth edition of The NRCA Roofing and Waterproofing Manual, published in 1996. This manual is an excellent resource for reviewing typical metal roofing systems, design considerations, and recommended architectural details, among other relevant information.
Section 6.7 of the NRCA manual describes slope considerations for metal roofs as follows:
Most architectural metal roof panel systems are designed for a minimum 3:12 (25 percent) slope for the roof assembly system, except for the flat lock soldered seam system and structural standing seam system, which can be used on a low slope. As the slope of the roof decreases, the need to increase seam height with the addition of seam sealant or sealant tape (e.g., butyl) increases.
The MBMA published the first edition of Metal Roofing Systems Design Manual in 2000. This comprehensive manual provides a large volume of useful information. With regards to sealants, Section 7.8.5 offers the following:
Proper execution of field applied sealants is vital to the finished weather integrity of any low slope, hydrostatic roof system. In principle, each panel is gasketed 360° around its perimeter. Along the side seams, sealant is factory applied. At all other panel termination points it is the duty of the installer to apply sealant beads that marry into and establish the continuity of this gasketed seal between factory applied sealant beads.
While I completely agree with this statement, it applies most directly to hydrostatic, standing seam metal roof assemblies where factory-applied side lap sealant is more common. For hydrostatic, lap seam roof assemblies, the installation of the side lap sealant typically rests completely with the installer.
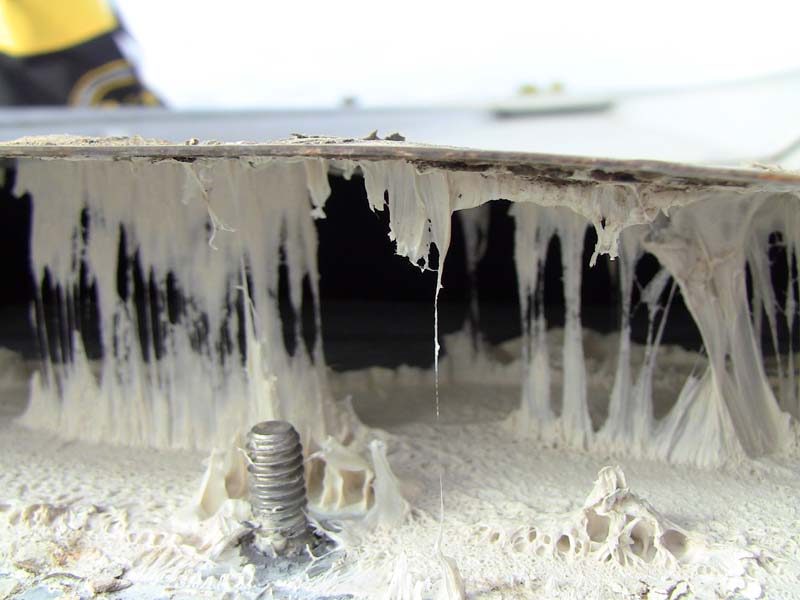
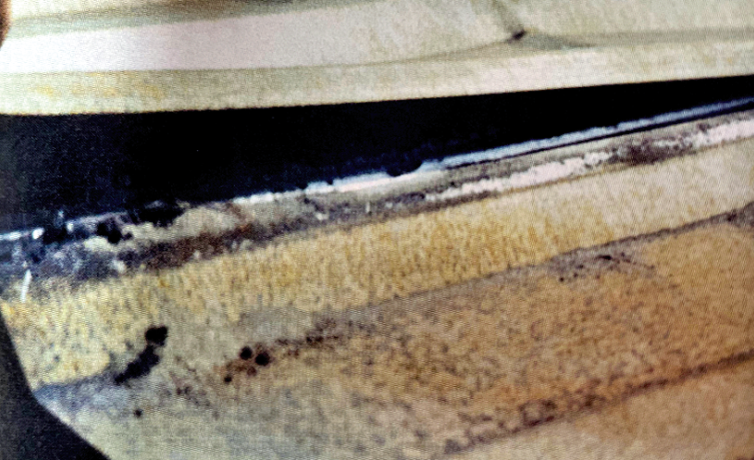
Although the end lap sealant remains effective, the absence of any side lap sealant on this roof resulted in extensive interior damage.
Manufacturing Specifications
While it would be inappropriate to critique the specifications of specific metal building manufacturers, a brief discussion of typical requirements is necessary. I reviewed the specifications of manufacturers represented in the library of my office. I would estimate that approximately 70 percent of the largest metal building manufacturers are represented in our collection.
Most manufacturers address the potential for water intrusion by applying side lap sealant at the eave of the roof. This area of the roof is considered to be the most vulnerable to water intrusion due to the potential for ice damming and the proximity to gutters and downspouts that could clog and overflow. The sealant may extend as much as 15 to 20 ft. into the field of the roof, depending on climatic conditions and the span of the roof. Some manufacturers provide a table to determine the specific side lap sealant requirement, depending on the span of the roof. In some cases, manufacturers require side lap sealant to be installed for the full length of the roof panel when the slope is less than 1:12.
Too often, however, manufacturers tend to use generic notes that read something like “seal roof panel side laps with mastic when specified.” While I found several variations of this note, they all seem to serve the same purpose — leaving the decision of using side lap sealant up to somebody else. In too many pre-engineered metal building projects, this decision is made by the contractor and/or the building owner without proper consideration of all the relevant variables presented by this article.
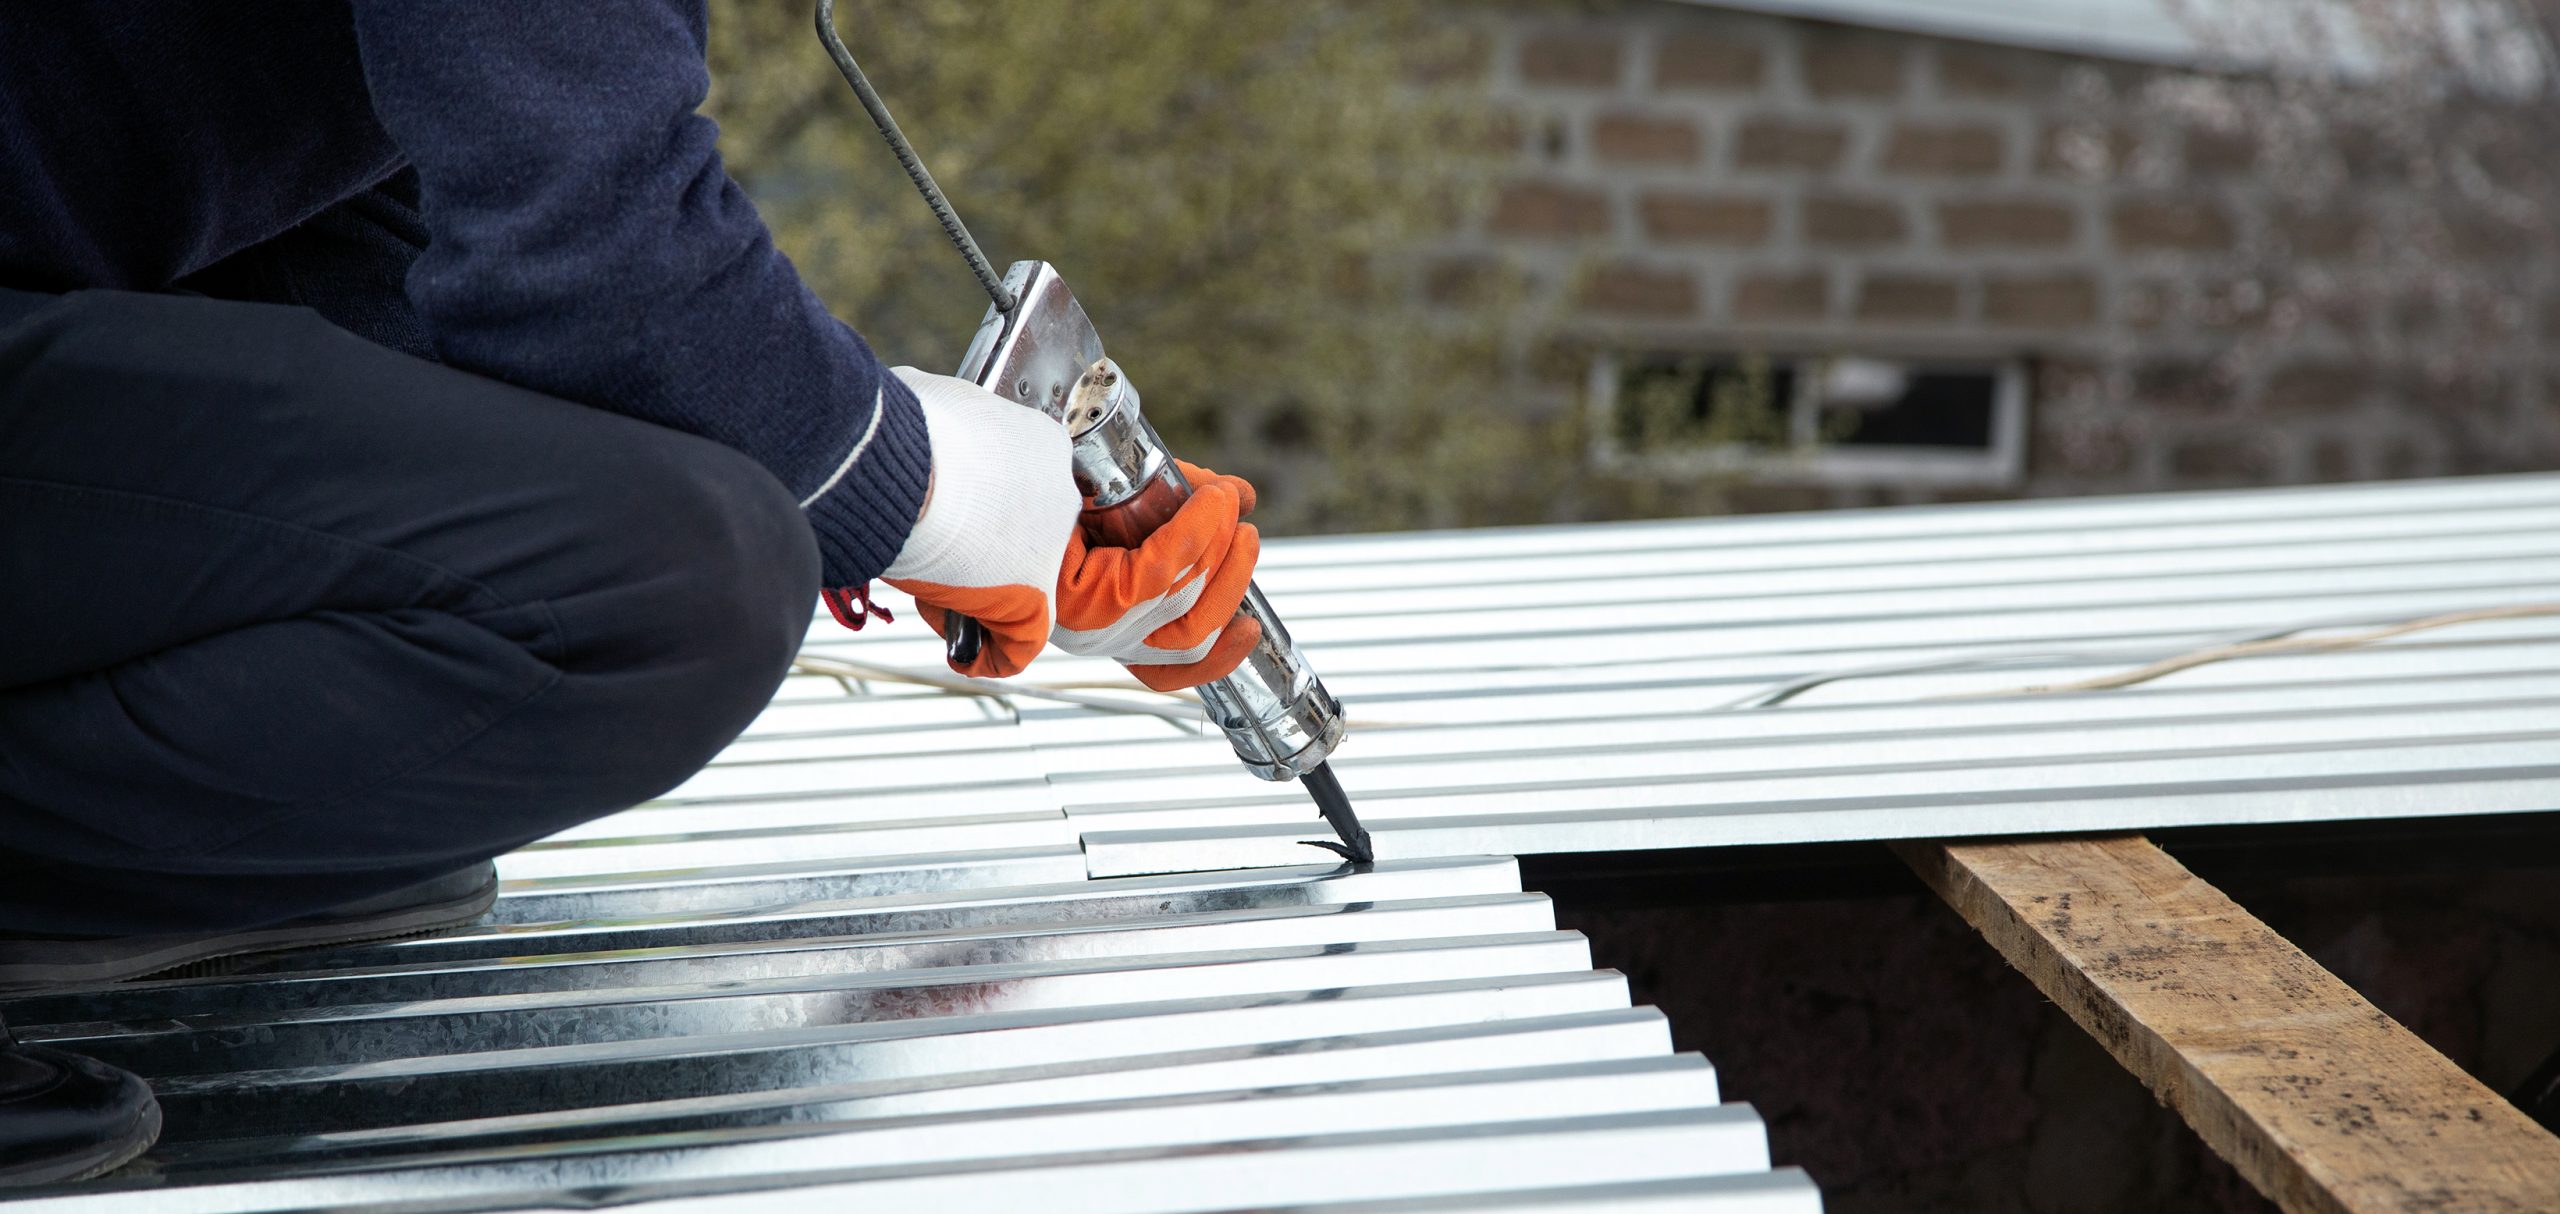
In terms of the sealant itself, the most common specification for side laps is non-curing tape-applied butyls. These are excellent sealants that will easily last the life of a building if applied properly. A few of the basics of proper sealant application include 1) following the manufacturer’s recommendations regarding surface preparation and weather conditions required for application, 2) installing the sealant in a concealed condition where it is protected from environmental exposure, and 3) installing the sealant on the outboard side of the fastener holes (large scale damages can result from making the mistake of placing the sealant on the wrong side of the fasteners).
How to Determine When to Use Side Lap Sealant
As discussed previously, unless you have a very good reason not to use side lap sealant, I would strongly recommend its use whenever possible. The use of side lap sealant is particularly important when a low slope roof is combined with the potential of adverse weather conditions such as strong winds, heavy rain, snow, or ice. Good reasons not to use side lap sealant are limited to warm weather climates with little chance of adverse weather conditions and/or a building occupancy where water intrusion would be of little or no consequence.
Due to sealant’s relatively low cost, saving money is typically not a good reason for omitting side lap sealant from metal roof specifications. As the title of this article suggests, using side lap sealant should be considered as a low-cost insurance policy with long-term benefits that should not be ignored. MR
References
Standard Building Code, Southern Building Code Congress International (SBCCI), Birmingham, Alabama.
Beall, Christine, “Water Penetration in Building Envelopes,” Interface, October 2000.
National Roofing Contractors Association (NRCA), The NRCA Roofing and Waterproofing Manual, 4th ed., The Metal Roofing Manual, Vol. 2, 1996.
Metal Building Manufacturers Association (MBMA), Metal Roofing Systems Design Manual, 1st ed., 2000.
Derek A. Hodgin has 30 years of experience as an engineering consultant and is responsible for facility condition inspections, failure analysis, damage assessments, and forensic engineering investigations of all types of structures. His experience includes failure analysis of a wide variety of building enclosures and roof systems. He has investigated and testified regarding the performance of various building products including fire retardant treated (FRT) wood, exterior insulation and finish systems (EIFS), hardboard siding and trim. Derek has also designed, permitted and investigated failures of civil and coastal projects such as residential and commercial developments, marinas, docks, shoreline stabilization and retaining systems, basin and channel dredging. A large part of his projects have included analysis of deficient construction cases including roofs, exterior walls, windows, doors, structural framing, civil site work and building code review. He has investigated and testified regarding various types of personal injury cases including slip/trip and fall, railing failures, swing collapse and ladder accidents. Derek has performed engineering assessments of hurricane, tornado, hail, wind, ice and fire-related damages for a wide variety of commercial and residential structures in the United States and Caribbean.
Sealants: Improving Through The Years
By Metal Roofing Staff
Twenty years ago polyurethanes and solvent-based caulks were the prevalent sealants used in construction. Both were organic, so they degraded over time. Further, polyurethanes often required a primer and over time pulled away from the substrate. The solvents in sealants tended to evaporate, leading to shrinking and cracking.
Today’s sealants are more technologically advanced according to Joe Borak, Senior Vice President of Sales at Novagard. They are more durable and more environmentally friendly, which has become more and more important as homeowners and contractors attempt to build more sustainably. They are also easier to work with.
One form of sealant in use today, silicone, employs a different chemistry. These sealants are inorganic and will not degrade, shrink, or crack over time. Other benefits of these waterproof sealants are that they resist mold and mildew once they are oxime cured, meaning they cure on exposure to the moisture in room temperature air. They’re non-corrosive and VOC compliant, too.
Silicones are UV neutral, so ultraviolet light does not affect them and consequently, the sealant can keep the roof sealed longer. One example of a silicone solvent is Novagard’s NovaFlex product line, which is available with up to a 20-year warranty.
Of course, a sealant’s durability is partially dependent on the application process. Here are a couple of tips to help you install sealant that will last:
• Consider all of the variables involved when doing a job including the kind and slope of roof, the climate, and manufacturer’s directions when choosing a sealant.
• Establish before use whether the sealant meets the requirements and specifications established by the NAHB (National Association of Home Builders) Research Center to comply with the green building initiative, and the USGBC’s (United States Green Building Council) LEED program guidelines.
• Try to match the sealant to the application. The manufacturer should provide enough information so you know what kinds of applications the sealant is formulated to address.
• Don’t make the mistake of choosing a sealant based on price alone. A better product can save the installer from failures and callbacks.
• Prep the surface. For refurbishments, scrape off any old, chunky caulk with a putty knife. For fine remnants, use a wire brush and then blow off dust and debris.
• Lay down plenty of sealant evenly over the surface to do the job properly. MR