We asked manufacturers of metal roofing panels and shingles to share their top recommendations for selecting the right product for each specific job, as well as for general tips regarding the installation. Here is what they had to share about metal roofing selection and installation.

www.edcoproducts.com
What are important considerations metal roofing contractors should keep in mind when selecting a panel or shingle for a specific job? Why do these important factors matter?
When selecting a metal roofing panel, contractors have a lot of choices available to them. A couple of the most important choices are profile and finish. There are numerous [metal shingle] profiles offered by various manufacturers, but some of the most common are a shake profile designed to look like hand-split cedar shakes, or a slate-type profile, which mimics traditional slate roofing.
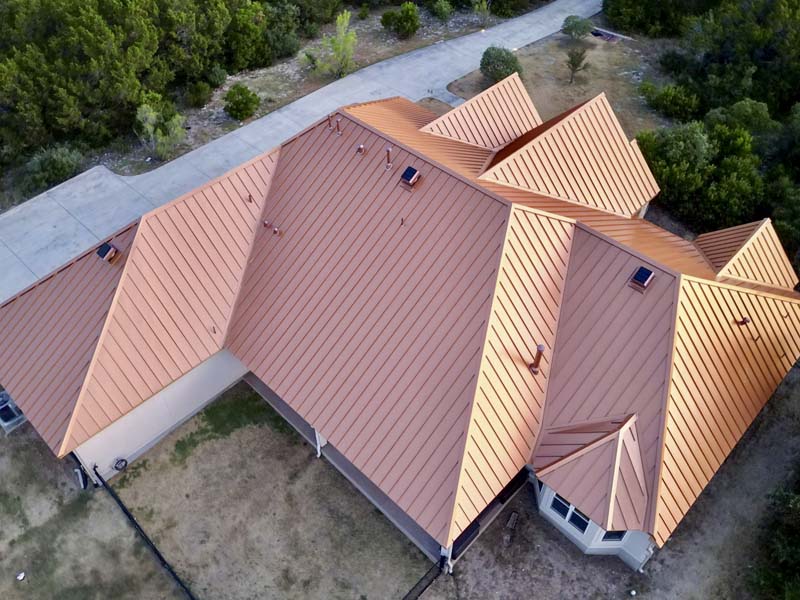
For coatings, there are three main options: first would be uncoated, with the panels left bare to develop a natural patina over time; stone-coated, where crushed stone and minerals are glued to the substrate to look more like a traditional asphalt shingle; and painted panels. Painted panels can run the gamut from a single solid color to decorative panels with detailed wood grain, to variegated panels with highlights, shading, and shadow lines.
These choices are important because they are going to greatly affect the appearance of the customer’s home or business. A striking roof can make a home stand out in a neighborhood, or a more subtle design well help it blend in.
What are “tricks of the trade” regarding the installation of panels or shingles?
One important step that contractors sometimes neglect is snow and ice protection. With metal shingles, you are not going to have ribs like a standing seam roof, which are easy to install clamped snow guards on. If you plan ahead, you can install snow guards during the installation, which allowing the fasteners to be covered by the roofing panels. If you install snow protection after the install, you either need to use an adhesive, or fasten them to the roof deck through the panel (which could eventually lead to leaks).
Speaking of leaks, the second trick is to keep in mind that the most important factor in waterproofing the roof is to make sure everything is properly flashed and a high-quality underlayment is used. Even the best panels available can leak if not flashed following best practices. And since a metal roof is built to last 40 to 50 years or more, #30 felt may meet the minimum code, but it’s worth it to spend a few more dollars and install both a high-quality synthetic underlayment as well as peel-and-stick ice and water barriers.
www.garlandco.com
The two most critical considerations when selecting a panel
Manufacturer involvement and panel performance characteristics are the most important considerations.
Expanding on the manufacturer’s involvement, a contractor will be able to lean on them to guide them through the entire process, from first contact to laying down the last panel on a project. The better manufacturers will have a resource on-site to help the installers understand each and every aspect of their products. They’ll also provide project-specific designs, meaning that every single project is being designed and installed, accounting for all environmental factors like wind, rain, snow, UV exposure, etc., that will be acting on that roof.
Every single project is different, so it is extremely important to have the manufacturer help determine the right products and design for each situation.
As for the panel performance characteristics, a contractor should utilize a roof system that was designed with them in mind. For instance, a standing seam metal roof system with a single-piece structural clip and clip/sealant separation that allows for unlimited thermal cycling. This design is superior in performance and ease of installation to the often-used two-piece clip system. The two-piece clips require the installer to decide whether the roof needs to expand or contract during the install. These also typically have sealant/clip interaction. As the system expands and contracts, the clips can bind if installed in the wrong direction and will wear away at the sealant. The one-piece clip design, however, eliminates the guesswork in clip positioning, and the worry of sealant deterioration, which provides a much simpler install and better-performing roof system.
Tricks of the trade vary with each and every roof system
Every panel design is different, so each one has little intricacies in the installation.
With that said, a generic trick during install for any type of metal roof system would be to square your roof before you begin. A roof that is started and not square can become skewed extremely quickly, possibly forcing more labor to correct and redo sections. It is also important to check every few panels as well, because an install can get off-square very quickly.
Another trick would be the utilization of shims. Oftentimes, a standing seam metal roof is fully installed, and the dreaded oil-canning effect is immediately obvious. It’s more likely that the oil-canning is not due to poor manufacturing, but could be attributed to a substrate (deck or purlins) that isn’t perfectly flat. Utilizing shims underneath the attachment points can bring a roof system up to plane, alleviating that translation of oil-canning from the substrate to the roof surface.
An installer can do an easy check on the flatness of a substrate’s surface by turning a roof panel on its side while running it up the slope. If there are gaps between the panel and substrate, shims will likely come in handy.
www.graberpost.com
Two items to consider when choosing your roof panels:
What expectations will the panel you choose be subjected to and how do these expectations affect the profile, substrate, and
paint system you choose? If the panel is simply a shade and shelter panel, some homeowners are fine with an ag rib panel with a polyester paint.
With that said, that same customer may want a profile, substrate, and paint system that is comparable to their other rooflines if the install will take place near other structures he/she already has in place or is planning to add in the future. If the panel is going on a residence or commercial application, you certainly want to use the highest quality substrate and paint system you can.
Another thing to remember is different panel profiles can give better results in certain situations. For instance, if you are installing panels on a low-pitch roof, you need to consider rib height and fastener placement to help avoid leak issues due to the possibility of pooling water on the roof. The great news is there are many options for panel profiles, substrates, and paint (regarding both warranty and color) to help you meet or exceed your customers’ expectations—if you address the issues before the project begins.
A second point to keep in mind is what type of demand will the finished roofing panels be subjected to? If the panels are going on a commercial setting or residential setting that will include equipment placed on top of them (such as solar panels or HVAC units), you need to consider what type of foot traffic the panels may see for routine maintenance and repair in the future. This can also help you determine the best profile, decimal thickness of the panel, and paint system.
If a roofing panel will be subjected to foot traffic for equipment maintenance and repair, a profile that is less likely to be damaged from someone stepping on it or a thicker decimal thickness for the panel may very well be a better option. In these scenarios, it is also worth your time to really evaluate the performance expectations of the paint system used to coat the panels. You do not want to use a lesser paint system and end up removing equipment so you can replace panels in a scenario that may have been avoided by using a better paint system.
Two items to help with your install:
A couple of items that may help you with the install of any roof panel are keeping a close eye on how the panels are running as you install them and avoid any excessive drilling of the panels. As you install the panels, it is a good idea to measure back to the gable end truss often, at both the top and the bottom of the panel, to make sure your panels are running straight. If you notice the top is getting ahead or behind when it is only off slightly, you still have an opportunity to fix it. If you get to a point and realize the top is running 3″ ahead or behind, it is time to remove panels you have installed to get back on track.
The problem with any excessive drilling is drilling into metal panels does create metal fines. They will be hot and tend to want to stick to the painted surface of a panel. Over time, those fines will rust on top of the paint. This will usually not create an integrity issue for the panel, but it will get you called back to the job site because to the owner, it appears the panel is rusting. The same thing happens if you try to use a circular saw and blade to cut metal.
The bottom line is, metal roofing panels are a great option for many roofing applications. Take the time to consider what panel will work best for your install and take the time to conduct a good install. There are great sources for your panels as well as knowledge to help you get started. Homeowners and building owners have never been as eager as they are right now to use metal roof panels on their projects, so the opportunity for you and your business is at an all-time high if you want to install metal roof panels.
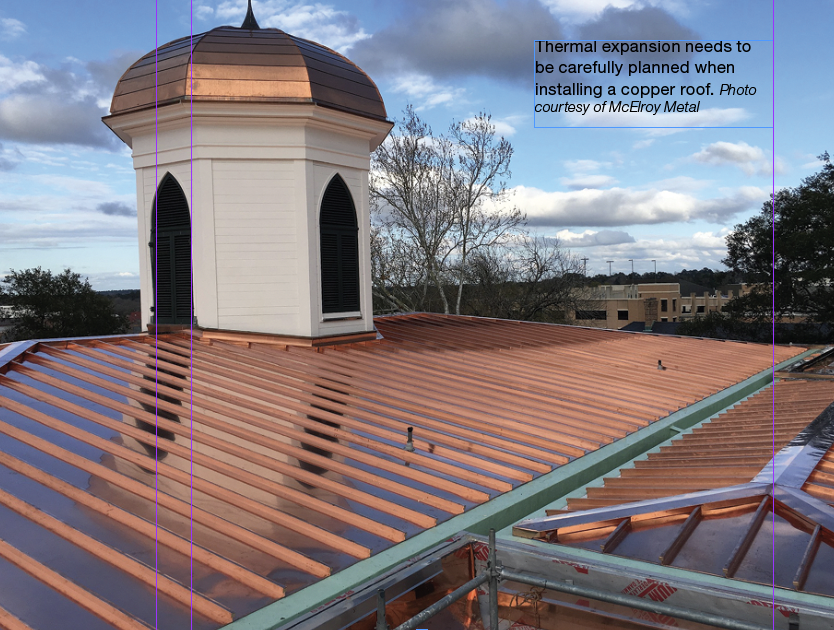
www.mcelroymetal.com
Contractors should consider the needs and performance expectations of their customers when suggesting roofing panels. Most manufacturers apply PVDF coatings to their standing seam systems. PVDF coatings provide the optimal long-term performance and offer the best protection against fade and chalk. However, many through-fastened panels are coated with lesser quality coating systems. The difference in quality and performance should be discussed with end users so they can make an educated decision about their panel and coating of choice.
The use of butyl sealants for metal-to-metal connections is key to high-performance roofs and improved weather-tightness. Most manufactures have developed installation details, which include where to place butyl sealants. These details should be followed to ensure long-term performance.
An architectural eave detail is the preferred installation for standing seam systems. Architectural eave details do not require the use of fasteners along the eave of the roofline. To install an architectural eave detail, the standing seams need to be removed to form an eave flange that is folded under the panel and engaged with eave flashing. Many manufacturers offer factory-formed eave notching, which saves the roofing contractor labor. Without factory notching, panels need to be fabricated on the job site by roofing crews.
Keeping roofing panels on module is key to a successful installation and will alleviate a variety of potential problems, such as material shortages, leaks, aesthetic concerns, and mechanical seaming issues if installing a field-seamed roofing panel.
www.pac-clad.com
When choosing a metal panel for each job:
1. Consider the region/location of the project to avoid finish warranty issues, because some manufacturers require aluminum for all panel system applications within ½ mile of salt or brackish water.
2. Consider the substrate pitch because some roof panel profiles have individual pitch requirements. These are based on water infiltration testing and designed to ensure a watertight project. Choose the profile that best falls within the parameters of said project.
3. Wind speed determines the panel system because certain panels are rated for higher wind speeds than others.
4. When choosing roofing panels, consider slope, because panels are rated for specific slope ranges.
Tips and tricks of the trade:
1. To achieve a balanced panel layout, begin by measuring the overall project width and divide same by one full panel width. Take the remainder of a non-full panel and subtract this from a full panel width. Take this sum and divide in half. This is the amount to remove from the first and last panels.
2. Prior to the start of panel installation, take accurate field measurements of the substrate such as irregular rake or eave conditions, which will require an irregular-width start panel and or “sawtooth” panels at the eave. Short substrate at the ridge or hip could affect proper anchoring of panels. High or low areas within the substrate will cause unnecessary oil canning.
3. Always square up the roof panels to the building. Structural steel has become so inconsistent and poor in the 21st century that it is imperative to square up the roof covering to account for a building that is not plumb and is out-of-tolerance.
4. Standing seam metal roofing is not a forgiving roof covering. Once it is installed, make sure other trades are not allowed to walk on it. Despite common beliefs, a metal roof’s finish is not impervious to foot traffic.
www.provia.com
Important considerations when selecting a metal panel:
Number one is energy savings. Metal roofing can greatly improve a home’s energy efficiency; coated metal is reflective and doesn’t absorb solar heat like an asphalt shingle roof would; it re-emits solar radiation and reduces energy consumption.
Number two is the longevity, durability, and long-term value of a metal panel roof. It lasts longer and stays intact far better than materials like asphalt or cedar. The lifespan can improve the value of a home.
Saving money on utilities is important for homeowners. Purchasing energy-efficient roofing products gives them peace of mind and saves money in the long run. And a strong roof with a long life saves them from having to repair or replace due to weather or wear-and-tear.
“Tricks of the trade” regarding panel installation:
Number one is proper ventilation. Without it, you’ll see a lot of condensation in the attic space and moisture collecting on the underside of the roof. If left untreated, the homeowner will have damage. To achieve good ventilation, you need both intake vents, typically at the bottom of the roof in the building’s overhangs, and exhaust vents, often near the peak. Fresh air comes in at the bottom vents of the roof and carries warm, moist air out of the attic through the exhaust vents. The goal is to have continuous air exchange in the attic space, allowing the roof to “breathe” and prevent condensation.
Number two is not necessarily a “trick,” just common sense: take your time and do a thorough job. Rushing through so you can get to the next job causes shoddy workmanship. Slow down, be methodical, and make your moves count. Metal roof installation is practically an art—it takes practice and experience.
Another commonsense suggestion is to make sure to communicate with the homeowner at the installation site. Respect them and protect the property—for example, make sure the owner’s AC unit is covered during tear-off so nails don’t fall inside it. This is someone’s home and yard; you must be careful, cautious, respectful, and clean up after yourself.
A third tip is to get yourself the proper tools for easier and more efficient installation. Tin snips for example—spend the money to get both left-cut and right-cut hand snips.
One more thing—make sure you wear your safety harness and that your anchor points are fastened correctly. Metal is slippery when it’s wet, so wear the right shoes and be mindful of your surroundings. MR