Mistakes will happen now and again, and they can lead to leaking roofs or aesthetically displeasing roofs, panels blowing off in the wind, or other issues. None of the results are going to be positive for you, your customer, or your reputation. While you can’t avoid mistakes altogether, you can lessen the likelihood of errors if you know the main things to watch for. We will provide some tips for proactively avoiding mistakes, too.
What Are Some Prevalent Mistakes?
Naturally there are any number of mistakes that an installer could make, but we will focus on the more common mistakes that manufacturers run across.
One of the errors that we heard from several industry professionals: Make sure the roof decking is solid when you are re-roofing over the existing roof. A roof that has leaked can indicate that the decking could be in poor condition.
“If you are unsure about the decking, remove the shingles and underlayment and check the decking. You may find that some of the decking is fine and you need only replace a part of it, or you may need to replace the whole thing,” said Noah Oberholtzer of Hixwood.
Even on a new roof, you should ensure the deck is half inch sheeting at minimum for a solid fastening.
Another common mistake is failing to ensure that your screws are not missing the purlins. “There are only about 1½” to work within,” Oberholtzer said. “If you use a chalk line, it will help keep your fasteners straight, which will also help the roof’s aesthetics.
Furthermore, if you are fastening metal with a wider purlin span, lower gauges of metal are required, and it is important to ensure that you adjust the fasteners used accordingly. Failing to make these changes can lead to oil canning.
Oberholtzer said, “The common gauges are 26 and 24; the thicker the panel, the less likely it is to oil can.”
“Heavier metal gauges are more forgiving,” Shannon Clark of True Metal Supply said, “but you should also utilize higher quality metal alloys to improve performance and reduce the risk of oil canning. Provide proper support for the roofing panels during installation and use backer rods when needed, as well.”
“Avoid long runs of roofing. Most panel manufacturers recommend keeping panels under 24 feet in length,” Mike O’Hara at Levi’s Building Components said.
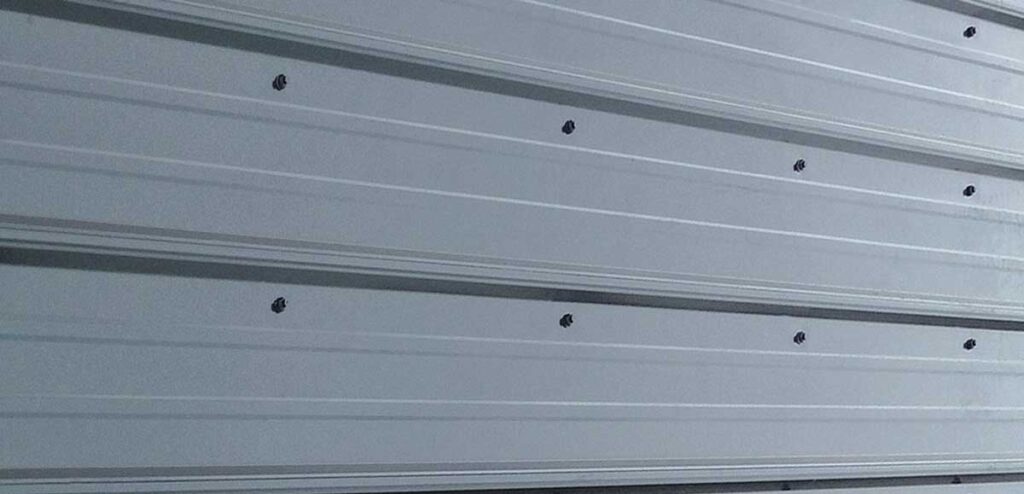
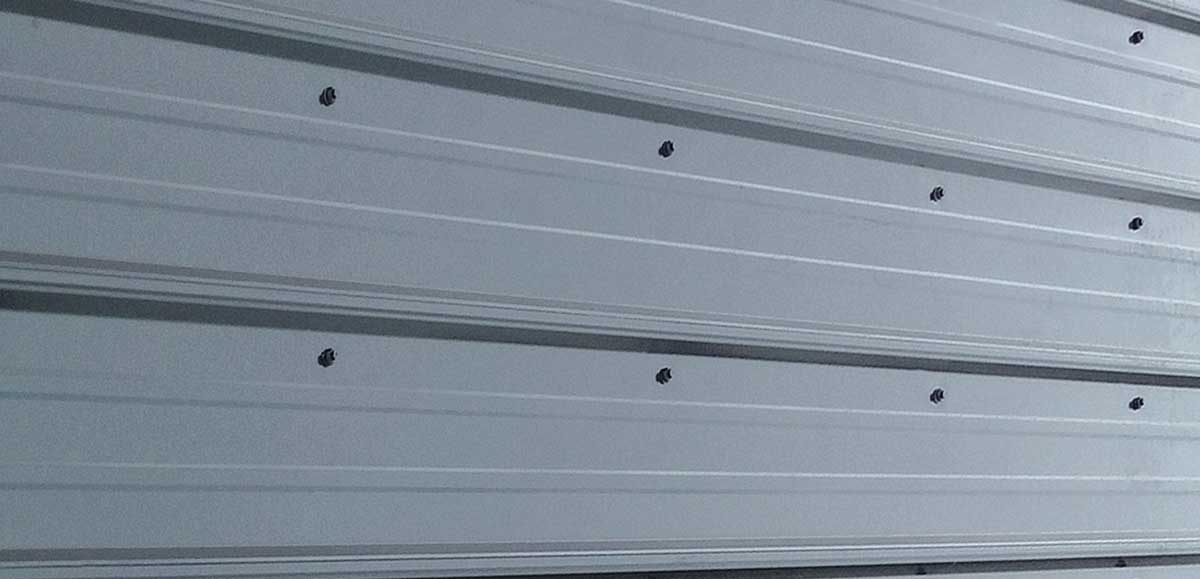
The most-mentioned error involving the fasteners is over- or under-driving the screws.
“One of the most common mistakes roofers make is overdriving or underdriving the fasteners,” Clark said. “This can lead to leaks or allow the panels to shift over time. To avoid this, roofers should use tools with adjustable torque settings and stop driving when the washer compresses properly – creating a secure seal without overdriving. If the fastener has already been overdriven, the best fix is to remove it, and use an oversized fastener with a larger diameter shaft,” she added.
Other problems with driving arise when installers drill screws at speeds that are too high. “Especially in metal to metal applications,” O’Hara said, “the screw drill tip must be allowed to cut through the framing member.”
Often, roofers make the mistake of using the wrong fastener for the project. They may have overlooked the length and chosen screws that are too short. O’Hara said that most panel manufacturers recommend 1½” screws.
Jerod Webber of Dynamic Fastener said, “Installers should consult their screws supplier and provide them with application specifics. This will allow the supplier to recommend the correct fastener for the application.
The fastening pattern also seems to cause some problems for roofers. Oberholtzer said that often the typical install guide will recommend a screw every 2 feet. However there are projects where the architect will specify fasteners be placed every 16” or 12”. It is always important to follow the steel manufacturer’s/architect’s recommendations so that the panels are secure and not apt to pull up in a strong wind.
Another frequent mistake according to Clark is fastening through the rib instead of the flat part of the panel. “Fasteners on the rib have less bite into the decking, leading to movement and potential leaks.”
Michael Vaughn of Fabral said that the results of installation errors are usually leaking, oil canning, and corrosion, and it can impact the warranty.
“These errors can lead to having to replace all or part of the new roof,” Vaughn said. “To avoid this, installers can get certified training in installation of the metal panels.”
Tips for Through-Fastened Panel Installation
• Before starting the job, make a checklist of everything you need, making sure that the components match the manufacturer’s recommendations.
• Verify measurements before starting.
• Driving screws at an angle can cause washer distortion and leaks; make sure you are driving perpendicular to the surface.
• When fastening a panel to a framing member thicker than .210”, use a #5 drill point screw. If the framing member is less than .210” thick, a #3 drill point should do the trick.
• Make sure that you are properly overlapping panels, applying the proper sealant and butyl tape as directed by the manufacturer to avoid leaking and corrosion.
• Avoid walking on panels as much as possible. If you must, walk on the flat of the panel that’s already fastened in place.
• It’s a good plan to have some members of the crew on the ground, while others work on the roof, so no one is dragging dirt, rocks, or debris onto the roof which could harm the panels.
• Wear soft-soled shoes. Don’t walk on hot panels as they are more likely to dent.
• Foam kneeling pads or roof jacks can help distribute weight on the panels so they are not harmed.
• Take photos by phone or drone for quality control.
• Use a fastener with a premium coating and UV resistance since it will be exposed to the elements.
• In extreme climates, use a sealant or tape under the fastener head for extra protection.
• In corrosive environments such as coastal areas, stainless steel, cap, or die cast head screws made with zinc and aluminum alloy are good choices.
• If fastening aluminum to steel, 300 series stainless steel screws will prevent galvanic corrosion.
• Choose a metal to wood fastener which has great sealing powers. For example the Atlas WoodUltimate Fastener has four sealing points to ensure a positive seal and a zinc head which offers a lifetime warranty against rot.
• Use a #12 or #14 screw if fastening into something other than solid wood. This will provide more holding power.
• Use a self drilling screw when fastening into steel.
• Use stitch screws on the panel overlap on lower pitch roofs to avoid ponding water.
• Avoid overdriving fasteners by using the proper tool.
• Consider using rigid board or spray foam under the panels. If batting is used, be careful not to compress the insulation. This causes a loss of R-value and can cause distortions in the panels.
• Read manufacturers’ instructions every time because products may differ.
Fasteners for Metal-to-Metal and Metal-to-Wood
By Dynamic Fastener
It is important to ensure that you are using the correct type of fastener, whether you are fastening metal to metal or metal to wood, to ensure a secure bond.
When fastening metal panels to wood, a sharp point or Type 17 fastener should be used. These points will allow the fastener to pierce the metal panel, without pre-drilling, and will provide good pullout values in the wood substrate. When attaching metal panels to metal framing a self-drilling fastener would be used. Base substrate thickness will determine whether a T3, T4, or a T5 would be necessary.
Different gauges and grades of metal factor into how to fasten metal roofing without making mistakes, too. Carbon steel self-drilling fasteners for attaching to metal are available in a range of drill capacities. #14 Dia. T1 fasteners should be used for light gauge metal to light gauge metal (.024” to .095” total steel thickness). They are commonly referred to as stitch screws, and are often used for flashing. #12 Dia. T3 fasteners are a structural fastener used for attaching light gauge metal to steel framing (.036” to .210” total steel thickness). #12 Dia. T4 fasteners are for attaching to structural steel (.125” to .375” total steel thickness). #14 Dia. T5 fasteners are for attaching to heavy structural steel (.250” to .625” total steel thickness).
Preparing For a Through-Fastened Reroof Job
By Best Buy Metals
Before you decide to install a metal roof over existing asphalt shingles, you need to answer a number of important questions:
1. How many layers of shingles are currently installed?
Most building codes allow you to install a metal roof over 1-2 layers of shingles, but no more. Verify codes in your area before installation.
2. Is the roof decking (OSB, plywood) in good condition?
Thoroughly inspect the decking and replace any areas that are in disrepair.
3. Are the shingles laying flat or buckled?
If the current shingle roof is distorted to the point that you see high buckling rows, remove them to ensure they don’t transpose through the new roof.
4. Does the model of metal roofing recommend going over shingles?
While most metal roofing panels allow roof-overs, it is best to check.
After you’ve considered these questions and you feel confident the roof is a good fit for a roof-over, here are some tips to get you off and running
1. Before installing the new roof, you’ll want to cut the shingles flush to the fascia at the eave (gutter edge) and rake (sloped edge). This ensures they won’t be seen or interfere with panel and trim flashing for the new roof. The old drip edge may need to be cut off as well, depending on the type of metal roofing and metal roof flashing that will later be installed.
2. Install underlayment between the shingles and the new metal roof. This can be synthetic underlayment (preferred), 30lb felt, or a double bubble radiant barrier; and keeps the rough surface of the shingles off the backside of the metal roofing.
3. You can replace or supplement the underlayment with 1×4 or 2×4 lathing strips run every 2′ or so up the roof. These provide an air gap for additional insurance, provide a framework to walk on (especially beneficial on steep roofs), and if your rafters are bowed they can be shimmed up to straighten the roof and eliminate sagging. While eave and rake trims are always important, they are especially crucial when 1×4 or 2×4 lathing is installed, to help hide the edges of lathing around perimeters.
4. Even if you leave your shingles, you will need to remove ridge venting material and caps. In addition, metal roof pipe flashing will be needed for round pipes and penetrations. Also, metal roof flashing will still be needed around chimneys, skylights, and where roofs hit a wall (sidewall or endwall). MR